


SwiftUI TabViewの使い方、TabViewのデザイン変更方法
2020/11/27
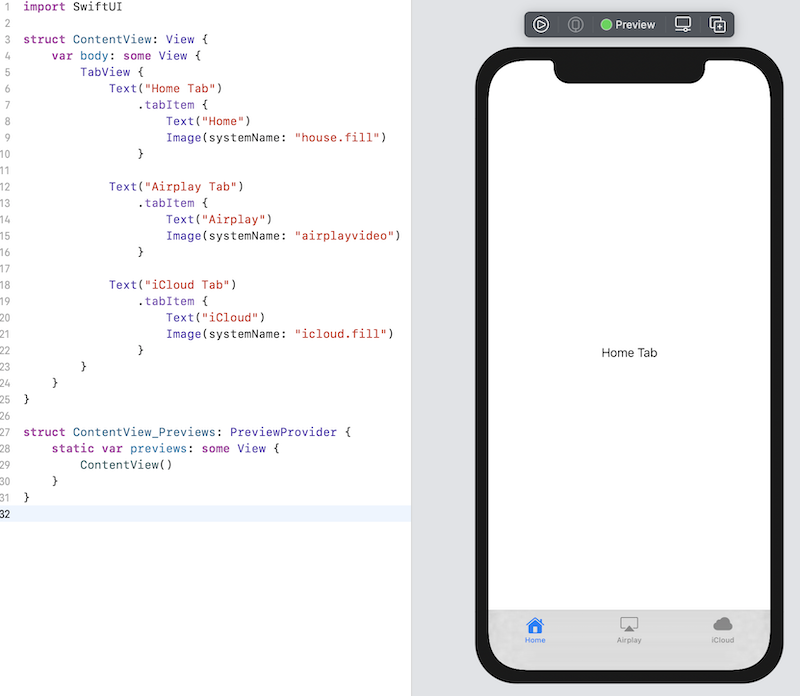
TabViewの利用方法
各Tabの内容として表示するViewに .tabItem のmodifierを指定します。.tabItem内にはImageとTextが指定可能です。
TabView内に表示するTabを順番に指定します。
import SwiftUI

struct ContentView: View {
    var body: some View {
        TabView {
            Text("Home Tab")
                .tabItem {
                    Text("Home")
                    Image(systemName: "house.fill")
                }

            Text("Airplay Tab")
                .tabItem {
                    Text("Airplay")
                    Image(systemName: "airplayvideo")
                }

            Text("iCloud Tab")
                .tabItem {
                    Text("iCloud")
                    Image(systemName: "icloud.fill")
                }
        }
    }
}

struct ContentView_Previews: PreviewProvider {
    static var previews: some View {
        ContentView()
    }
}
TabViewのデザイン適用
Tabの背景色やボーダー色を変更するには、init() 内で UITabBar.appearance()を使用して変更します。
struct ContentView: View {
    @State private var selection = 0

    init() {
        // 非選択時の画像、テキスト色
        UITabBar.appearance().unselectedItemTintColor = .purple
        // タブ背景色
        UITabBar.appearance().backgroundImage = UIImage.imageWithColor(.white, size: CGSize(width: 1.0, height: 1.0))
        // タブボーダー色
        UITabBar.appearance().shadowImage = UIImage.imageWithColor(.brown, size: CGSize(width: 1.0, height: 1.0))
    }

    ...
}

extension UIImage {
    class func imageWithColor(_ color: UIColor, size: CGSize) -> UIImage {
        let rect: CGRect = CGRect(origin: CGPoint(x: 0, y: 0), size: CGSize(width: size.width, height: size.height))
        UIGraphicsBeginImageContextWithOptions(size, false, 0)
        color.setFill()
        UIRectFill(rect)
        let image: UIImage = UIGraphicsGetImageFromCurrentImageContext()!
        UIGraphicsEndImageContext()
        return image
    }
}選択されているタブの色を変更するには、.accentColorをTabViewに適用します。
struct ContentView: View {
    var body: some View {
        TabView {
            ...
        }.accentColor(.red)
    }
}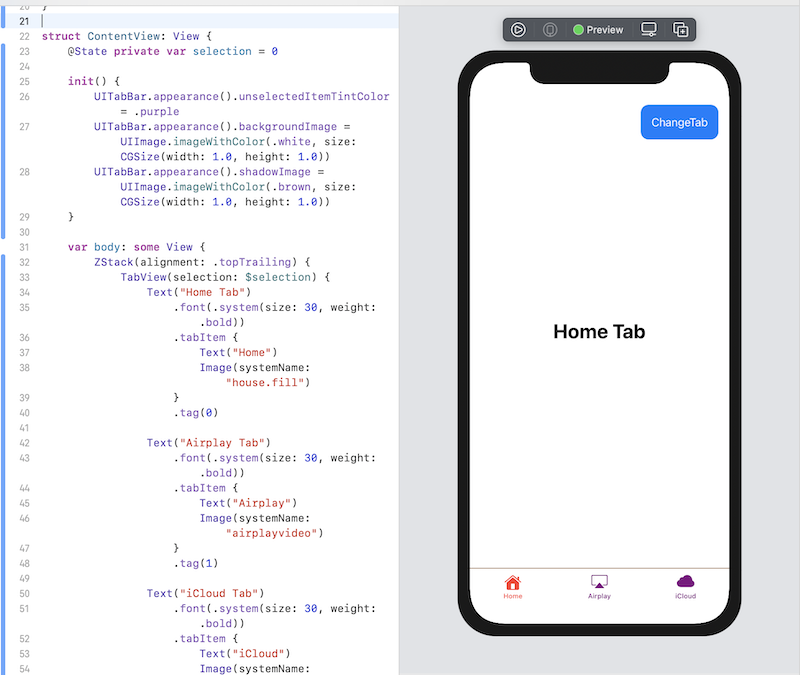
プログラムによるTabの切り替え
TabViewのselectionを利用することにより、切り替える事ができます。
次の例は、TabViewのデザイン適用と合わせた例になります。
import SwiftUI

extension UIImage {
    class func imageWithColor(_ color: UIColor, size: CGSize) -> UIImage {
        let rect: CGRect = CGRect(origin: CGPoint(x: 0, y: 0), size: CGSize(width: size.width, height: size.height))
        UIGraphicsBeginImageContextWithOptions(size, false, 0)
        color.setFill()
        UIRectFill(rect)
        let image: UIImage = UIGraphicsGetImageFromCurrentImageContext()!
        UIGraphicsEndImageContext()
        return image
    }
}

struct ContentView: View {
    @State private var selection = 0

    init() {
        // 非選択時の画像、テキスト色
        UITabBar.appearance().unselectedItemTintColor = .purple
        // タブ背景色
        UITabBar.appearance().backgroundImage = UIImage.imageWithColor(.white, size: CGSize(width: 1.0, height: 1.0))
        // タブボーダー色
        UITabBar.appearance().shadowImage = UIImage.imageWithColor(.brown, size: CGSize(width: 1.0, height: 1.0))
    }

    var body: some View {
        ZStack(alignment: .topTrailing) {
            TabView(selection: $selection) {
                Text("Home Tab")
                    .font(.system(size: 30, weight: .bold))
                    .tabItem {
                        Text("Home")
                        Image(systemName: "house.fill")
                    }
                    .tag(0)

                Text("Airplay Tab")
                    .font(.system(size: 30, weight: .bold))
                    .tabItem {
                        Text("Airplay")
                        Image(systemName: "airplayvideo")
                    }
                    .tag(1)

                Text("iCloud Tab")
                    .font(.system(size: 30, weight: .bold))
                    .tabItem {
                        Text("iCloud")
                        Image(systemName: "icloud.fill")
                    }
                    .tag(2)
            }
            .accentColor(.red)

            Button(action: {
                selection = (selection + 1) % 3
            }) {
                Text("ChangeTab")
                    .padding()
                    .foregroundColor(.white)
                    .background(Color.blue)
                    .cornerRadius(12)
                    .padding()
            }
        }
    }
}

struct ContentView_Previews: PreviewProvider {
    static var previews: some View {
        ContentView()
    }
}